|
Stamp: LC Emma Flower
Papers: My Mind's Eye 'Quite Contrary' |
A few weeks ago Little Claire put out a call for 5 new members to join their design team! I was so excited as it's something that I have often thought I would like to do one day and this seemed like the perfect opportunity. So I have been busy making up some new designs using all the Little Claire stamps that I own and here are the results.
First
I made a twisted easel card and layered patterned
paper onto the base and easel. I stamped the flower twice, once on a white
die-cut oval and again on a piece of spare card. The oval was lightly embossed,
layered and mounted as shown in the photo. The spare flower petals were coated
with ‘glossy accents’ and left to dry. When dry, I cut the individual flowers
out, curled them gently, decoupaged them onto the main image and added buttons.
Another small flower, glossed in the same way, was added to the stamped and
layered greeting. Coloured ‘Candi’ completes the design.
 |
| Stamp: LC Flowerhead |
Second, I made a Post-It note gift which was made by cutting a piece of thick, coloured card
and layering with patterned paper, a lace border and ribbon. The flower was
stamped twice on acetate and once onto a piece of white card. A piece of
adhesive glittered sheet was sprinkled with blue micro glitter and fixed to the
back of one of the acetate flowers. Permanent pens were used to highlight the
features on the other acetate flower and then all three were stuck together and
left to dry. The flower was then cut out and mounted onto the gift.
 |
| Stamp: LC Flowerhead |
With the same stamp, I also made a quick note card. The flower was stamped onto a small square card with a glue
pad, sprinkled with gilding flakes, tapped to remove most of the excess and
left to dry. Using both stencil and soft brushes the image was then brushed to remove
all traces of excess flakes leaving a beautiful gilded image. A red adhesive
gem finishes off the centre.
 |
Stamp: LC What Fun!
Papers: PMA Capsule Collection 'Heather' |
I thought I would make a variety of projects and not just cards so next I made a corner bookmark. It was made from a square of patterned paper. The
image was stamped onto a piece of white cardstock and coloured with Promarkers,
using a blender pen to add texture to the elephant’s skin. It was then matted
and layered onto the bookmark. A lace border, ribbon, punched flowers and
adhesive gems were added to complete the project which was then photographed on my Robert Redford biography!
 |
Stamps: LC Warming My Cockles
and Merry & Bright.
Tag card blank : Little Claire |
With my snowmen stamps I made a Christmas tag card. The two images were stamped onto white cardstock, scanned
and resized to fit the tags. The resized images were then printed out onto white
cardstock and coloured with ‘Promarkers’. They were matted and fixed to the
card. I also added a die-cut circular sentiment and a snowflake panel. Details
were highlighted with adhesive gems and ribbon & lace were knotted through
the holes at the top.
 |
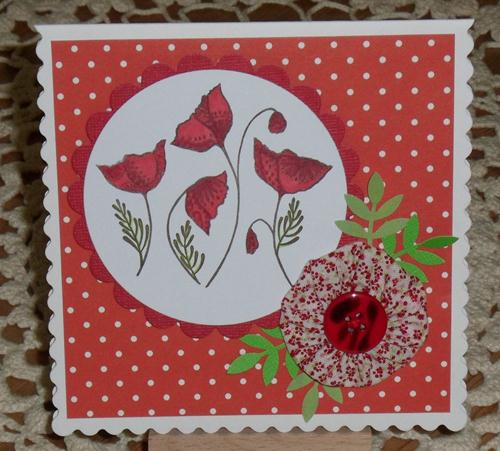
Stamp: LC Swirly Whirlies 'Poppies'
Paper: Craft Creations |
I decided to do some stitching for my next card. The 'Poppies' image was stamped onto a white die-cut circle and coloured
with ‘Promarkers’. It was matted and fixed to the card as shown in the photo. I
made a yo-yo by gathering up a circle of fabric and stitched a button on top.
This was fixed to the card with punched leaves as shown.
 |
Stamp: LC Good
Morning Robin |
I chose a Christmas theme for my little girl's door hanger. I die-cut an aperture from a piece of thick, coloured card
to make the hanger. The image was stamped onto a die-cut ivory label, coloured
with ‘Promarkers, highlighted with ‘Stickles’ and fixed to the bottom of the
hanger. I die-cut a frame for the aperture and decorated it with ‘Candi’,
coloured to match the image. The project was finished with a piece of satin
ribbon and dome stickers to spell a girl’s name.
 |
| Stamp: LC Swirly Whirlies 'Owls' |
Having been involved with Girlguiding nearly all my life, I couldn't resist making a Brownie card with the Swirly Whirly Owls. First, I attached a brown paper rectangle onto a yellow tent
fold card. Then I printed a Brownie trefoil onto a piece of white cardstock,
die-cut it into a circle, matted it, added a peel-off greeting and attached it
to the top of a tent fold card. The image was stamped onto a rectangle of white
cardstock, coloured with ‘Promarkers’ and layered as shown in the photo.
 |
Stamp: Butterfly
Paper: PMA |
For my last project I used my most recent stamp together with my love of paper folding techniques. I made a diamond shaped card using a piece of double-sided
paper and decorated the side panels and centre square with layers of the
reverse of the paper, inked at the edges. I stamped the image twice, once onto
a piece of white cardstock and once onto a piece of shrink plastic. The main
image was coloured with ‘Promarkers’, cut out, matted onto a co-ordinating
piece of cardstock, cut out, mounted onto the central square and finished with
adhesive gems. The shrink plastic image was coloured with coloured pencils to
match the colouring of the main image, shrunk using a heat gun and fixed onto
the bottom right of the right hand panel. Adhesive gems were added to the
corners.
So that's it! I have sent all the photos off and will keep all my fingers crossed, though I expect hundreds of people have submitted entries and can I wish whoever is chosen the best of luck!